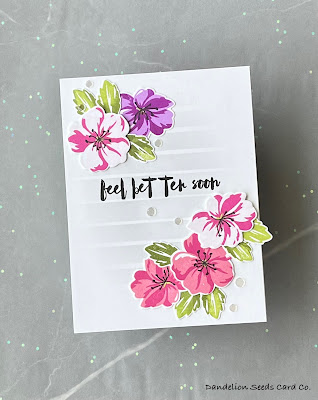
Today, I am sharing just one card because I'm so excited about it I don't want it to share the stage with another card. Sounds a bit smug, I know. But the reality is, I'm not normally this confident about my card making, so I guess it's okay for me to like one of my own creations every now and again.
This card was created for the first of two stamp layering classes in Altenew Educator Level 1. To be honest, this is one of only two layering stamps sets I even own. They're just not something I use, so this was a new adventure for me!One other thing I always struggle with is flower arranging. Usually, I trim and snip foliage so much in the process that I have to die cut new pieces because I've butchered the first set down to nothingness. Lucky for me, these particular flowers and leaves didn't require any trimming!
Class Tips:
Here are the tips I tried from class:
- Use an odd number of flowers/leaves
- Add leaves in a triangle around a flower
- Leave elements hanging off a card
- Create floral clusters around a sentiment, one larger than the other
- Stencil a soft background
The Background:
To create interest in the background, I stenciled the Altenew Ombré Stripes Stencil in Weathered Wood Distress Ink, using a super light hand. I inked it a bit heavier in the center and then feathered it out to nothingness on the edges. This sounds simple enough, but it did take me two tries to get it light enough to be just a whisper of color.
The Florals:
Remember, this is one of the only layering stamp sets I own, so that really cuts down on the decision-making process! Altenew Mini Delight Wild Geraniums bundle it is!
To get variety in the pink flowers, I used a second-generation stamping technique. For the first layer of the flower, I stamped in Gina K Dusty Rose ink, rotated my paper, and then stamped again without re-inking. This created a very light base color on half the flowers. The second, detail layer in all the pink flowers was stamped in Gina K Passionate Pink ink. This created striking contrast in the lighter pink flowers!
The flower centers were stamped in Gina K Jelly Bean Green ink. To be honest, these were a bit difficult to line up, but this layer turned out to be rather forgiving. All the flower stamens were stamped in Gina K Black Onyx ink.
For the leaves, I stamped once in Gina K Jelly Bean Green ink and then feathered just the edges of the stamp with Gina K Fresh Asparagus and stamped again. This created some shadowing and dimension on the leaves.
The purple flower was leftover from another project!
Card Assembly:
To assemble the card, I went back to the tips from the class lessons: two clusters, triangles, odd numbers, elements hanging off the card. When you follow a recipe, your chances of success greatly increase! I did trim 1/4" off the right side of the card so I could allow a leaf to hang off the edge and still have the card fit into a regular A2 envelope. I also layered additional white die cuts behind some of the flowers and leaves to add depth and dimension.
Finishing Touches:
In the Let It Shine Altenew class, I learned some embellishment tips and tricks, and I put those to use here.
- Add embellishments in triangles and diagonals
- One sequin/gem can be part of two triangles
- Vary sequin/gem size
- Tuck embellishments under die cuts
This graphic shows my thinking on the sequin placement. The pink dots at the triangle points represent sequins that serve double duty in my triangle configurations. I used the Pretty Pink Posh Sparkling Clear Confetti Mix. These add just enough sparkle without being distracting or obnoxious on this soft card.
At the center of the flower clusters, I stamped a sentiment from the Altenew Bamboo Rose set. It just happened to be the exact right size to fit between the flowers and within the lines of the stencil. Kismet, I think they call it.
What's the lesson here?
Sometimes, when you least expect it, you'll have a win. And when you do, embrace it. Because big wins don't come around every day. And if you celebrate a win when it happens, it'll help get you through the dry spots in between.
So, get out there and impress yourself today!
Thanks for stopping by!
Tammy
Tammy


absolutey beautiful!!! LOVE LOVE LOVE!!!
ReplyDeleteThank you so much!
DeleteHi Tammy - I'm in your AECP class- beautiful card!!!
ReplyDeleteHello! It's so nice to be crafting along with you! 🥰
ReplyDelete